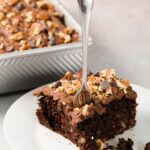
![Date and chocolate granola [low in refined sugar]](https://librareview.com/wp-content/uploads/2022/04/Healthy-black-forrest-birthday-cake-8-768x1024.jpg)

I think you already know that I am a self-declared breakfast nut. Yep. I wake up in the mornings starving and craving good food. Chia puddings, healthier pancakes, smashed avo on a slice of sourdough, fluffy banana slice, mascarpone scrolls, baked oats, overnight oats, they’re all great. But most mornings, I head straight for the granola cupboard.
And this date and chocolate granola, my oh my. It’s good. And I mean, it’s GOOOOOOD. If you’ve ever thought: “I’d like to eat more healthily in the morning but all the low sugar granolas taste like cardboard”, then this granola is for you.
Sweetened by dates and (dark and/or sugar free) chocolate chips, it’s sweet but low in refined sugar. You get gorgeous little soft chunks of seeds and nuts, stuck together by melted choc chips (and what’s not to love about that!). You will be able to taste subtle sweetness with pops of chocolate, coconut, seeds and nuts – definitely nothing even remotely cardboard-y. Its texture is also anything but dry. To the contrary, it’s fairly moist and “soft” in texture and stays that way in the cupboard too – which makes it delicious for pairing with plant based yoghurt (or tangy Greek yoghurt also works well), your favourite homemade jam and fresh fruit (like pictured below) or just with milk – straight out of the cupboard and no waiting for your granola to soften enough to be edible!
And, almost as a bonus, this breakfast is super nutritious. All those seeds, nuts and goji berries, I mean, c’mon – nutrition has never tasted this GOOOOD!


This date and chocolate granola – the best accident
And to think that this granola might have never seen the light of day! It is based on a recipe for “Breakfast bars 2.0” from Nigella’s cookbook Simply Nigella (which is excellent) which just did not work out for me, the first time I made it.
Yes, it happens to everyone – even if you follow the recipe to a T. The bars tasted delicious but they weren’t bars at all – they crumbled and wouldn’t stay together (looking back, I think I added too much water!). It didn’t take me long to decide that it would be a shame to chuck the whole thing, even if it didn’t want to be cut into bars. So I crumbled it all up and stuck it in my breakfast container. The next morning I had some with milk – and boom! My date and chocolate granola addiction was born.
Since then, I have improved the recipe slightly, tweaking this and that and adding a few ingredients to change the texture (see below).
I think you will understand my obsession with this granola once you taste it – the combination of dates (aka nature’s caramel), chocolate and coconut is unlike any granola I’ve tried before. I particularly enjoy the flavour combination of this soft granola, with smooth and silky yoghurt and homemade cherry berry jam – there is something about the combo of chocolate and cherry, and lightened by the yoghurt, which is just so addictive.
And, if you want to completely fall in love with this granola, try it still warm from the pan while it’s cooling. My daughter is somehow always there when this granola is just ready to eat. She just loves having little bites right out of the pan, with the gooey dark chocolate coating her little fingers and melting in her mouth, and she will come back for more over and over again! And do I mind? Knowing all the good-for-her ingredients in this granola, not at all!


How did I change the Nigella recipe?
When you look at the original Nigella recipe, you will see there’s a few similarities. My biggest goal was to make the whole mixture a little drier so that it would last well when stored in the cupboard at room temperature and wouldn’t need to be stored in the fridge.
To this end, I’ve added hazelnut meal, coconut and nuts, to increase the dry ingredients content in the overall mixture. And I must say, it works really well. I usually make this once a fortnight and will have it almost every day (say, 10 times each fortnight) and it lasts no problem being stored at room temperature over those two weeks. The original mixture was too wet and I stored it in the fridge as I was a little worried about food spoilage and perhaps even growth of harmful bacteria.
I’ve made a few substitutions to the original ingredients too – most importantly, substituting cocoa nibs for chocolate chips (and I think, in my humble opinion, that’s what really makes this recipe so GOOOOD), halving the amount of flaxseeds and swapping the other half for sunflower seeds, adding coconut, substituting cornflakes for brown rice flakes (delicious and more nutritious) and using my favourite five grain porridge instead of normal rolled oats to increase the variety of grains and fibre. But don’t fear, if you don’t have these “fancier” ingredients, cornflakes and rolled oats will work just fine!

Recipe
Date and chocolate granola [low in refined sugar]
Date mixture (first bowl)
- 250 g fresh or dried dates, pitted
- boiling or very hot water (to cover)
Second bowl
- 2/3 cup goji berries
- 1/2 cup pepitas (pumpkin seeds)
- 1/2 cup flaxseeds (linseeds)
- 1/2 cup sunflower seeds
- 1/2 cup dark chocolate chips (you can also substitute sugar free chocolate chips like these – I sometimes use a combination of dark and white)
- 3 tbsp chia seeds
- 1 cup brown rice flakes (or cornflakes)
- 1 cup five grains porridge (or rolled oats)
- 1/3 cup shredded coconut
- 1/2 cup hazelnut meal (or you can substitute almond meal, or even LSA mix)
- 1/2 cup macadamia pieces (or lightly crushed macadamias) (or substitute other nuts like cashews, walnuts, pecans or hazelnuts, lightly crushed)
- 1/2 cup slivered almonds
- 2 tsp cinnamon
Date mixture (first bowl)
Place the dates in a glass bowl and cover with boiling or very hot water (I use hot water just from the tap, it works fine).
A plastic bowl should be fine too, but just be mindful that the dates might discolour it – glass is safer from that perspective. Set aside to allow the dates to soften.
Date mixture (first bowl)
Drain the water carefully from the dates (it may still be hot!) and place the softened dates into a food processor, with a cup of lukewarm water.
Blitz until you get a smooth paste (it shouldn't take long). If you have a little spout on your food processor like I do, make sure you cover it with paper towel or tea towel before you start blitzing, as the water will try and dribble out.
Assembly
Place the smooth date paste from your food processor into the second bowl with all the other ingredients and mix everything thoroughly together.
Transfer all of the granola mixture into the pre-prepared baking pan and spread evenly. I usually press it down gently, so that when it bakes and cools, it easily breaks into chunks.
Pop the baking pan into the pre-heated oven and bake for about 30 minutes until brown around the edges.
Pull the pan out of the oven and let the granola cool down completely in the pan (unless you want to taste it while it's still slightly warm, in which case totally go for it – it's delicious).
When the granola is completely cool, go in with your fingers and break the mixture into small soft chunks while you're transferring it into your storage container. Not only this will give you lovely chunks to eat, it will leave you with chocolatey fingers to lick later. Your kids might like to help you with this step. You're welcome.
See notes below – I usually leave the container uncovered for some time, to ensure that the granola mixture is completely cool – before popping the lid on and storing away.
This granola will last in a cupboard for at least two weeks. I store it in a plastic or glass container covered with a lid. It’s important not to put the lid on until your granola is completely cool – this prevents “sweating”. Just leave the granola in the pan to cool down completely, then carefully transfer into your storage container and leave it on your kitchen bench with the lid off for a couple more hours, to cool completely, before popping the lid on and storing it away.
This amount will give you about 10 to 12 portions, depending on the size of your portion. Feel free to halve the amounts the first time around if you like, but ensure you use a smaller pan or a shorter baking time, so you don’t dry out your granola too much.
You have found this delightful recipe on Once a Foodie – onceafoodie.com. It was lovely to see you. Please come visit again.
(c) 2021 – copyright Once a Foodie. All rights reserved.

Recipe notes
Don’t be scared by the amount of ingredients in this recipe. Most, if not all, are dry, long-life ingredients which you can store in your cupboard. It’s just a matter of prepping the dates, blitzing them, chucking all the other ingredients in a bowl and mixing it all together, then baking. Easy as.
This granola will last in a cupboard for at least two weeks. I store it in a plastic or glass container covered with a lid. It’s important not to put the lid on until your granola is completely cool – this prevents “sweating”. Just leave the granola in the pan to cool down completely, then carefully transfer into your storage container and leave on your kitchen bench with the lid off for a couple more hours, to cool completely, before popping the lid on and storing it away.T
his amount will give you about 10 to 12 portions, depending on the size of your portion. Feel free to halve the amounts the first time around if you like, but ensure you use a smaller pan or a shorter baking time, so you don’t dry out your granola too much.
PS: If you’re looking for a drier, chunky granola full of delicious clusters, consider making my supercharged healthy cookie granola.


You can view the original post here
Related posts:
 Darkish Chocolate Granola (Grain-Free) – Dwelling Wholesome With Chocolate
 Homemade Almond Milk [Low Carb, Low Sugar, Keto] My 17 Day Diet Blog
 Chocolate Sorbet Recipe – Chocolate Coated Katie
 Chocolate Carrot Cake with Chocolate Cream Cheese Frosting
 Low Sugar Margarita Recipe – Kelly Jones Vitamin
 Honey Almond Chia Granola – Making Thyme for Health
 Rooster Marbella (Up to date Silver Palate Recipe)
Up to date COVID-19 Security Measures – Central Dental
COCONUT-DATE & GARDEN-CRESS NIBBLES – Diet With Vibha
Rooster Marbella (Up to date Silver Palate Recipe)
Up to date COVID-19 Security Measures – Central Dental
COCONUT-DATE & GARDEN-CRESS NIBBLES – Diet With Vibha
 Sharon Watson named new Chief Government and Principal of Northern College of Up to date Dance
 Jose Rodriguez Up to date Class Samara 2018
 Elite Diet and Efficiency Is All Sugar Unhealthy for You?
![[keyword]](https://librareview.com/wp-content/uploads/2024/02/education-5517017_960_720-150x150.jpg)